> ## Documentation Index
> Fetch the complete documentation index at: https://newscatcherinc-docs.mintlify.site/docs/llms.txt
> Use this file to discover all available pages before exploring further.
# Make.com Integration
> Use CatchAll in your Make.com scenarios
Use the CatchAll app to integrate structured web research directly into your
Make.com automation scenarios.
## Before you start
Before you begin, make sure you have:
* Make.com account
* CatchAll API key (obtain from
[platform.newscatcherapi.com](https://platform.newscatcherapi.com))
## Install app
The CatchAll app is available by invitation. Use the link below to install it in
your Make.com organization.
Open the [CatchAll app invitation link](https://eu1.make.com/app/invite/39a1ccee5332419f4260db8eddb4739b) in your browser.
On the installation page, click **Install** to add CatchAll to your Make.com
organization.
The app is now available in your scenario editor. When you search for modules,
NewsCatcher-CatchAll appears with an `Invited` badge.
## Configure connection
Set up your API key to authenticate CatchAll modules.
Click **+** in any scenario, search NewsCatcher CatchAll, and select a module.
When you add your first CatchAll module, a connection dialog appears
automatically:
1. Click **Create a connection**
2. Enter a connection name
3. Paste your CatchAll API key into the **API Key** field
4. Click **Save**
The connection is now available for all CatchAll modules in your scenarios.
Select it from the **Connection** dropdown in each module.
## Available modules
CatchAll modules are organized into Actions and Searches. Actions perform
operations, while Searches retrieve data.
### Actions
| Module | Description | Endpoint |
| ----------------------------- | ----------------------------------------------------------------------- | --------------------------------- |
| `query-builder` | Get suggested validators, enrichments, and date ranges for a query | `/catchAll/initialize` |
| `submit-query` | Create a new CatchAll job | `/catchAll/submit` |
| `continue` | Expand an existing job to process more records beyond the initial limit | `/catchAll/continue` |
| `create-monitor` | Schedule recurring jobs | `/catchAll/monitors/create` |
| `create-monitor-with-webhook` | Schedule recurring jobs with webhook | `/catchAll/monitors/create` |
| `enable-monitor` | Resume a paused monitor | `/catchAll/monitors/{id}/enable` |
| `disable-monitor` | Pause a running monitor | `/catchAll/monitors/{id}/disable` |
The `create-monitor-with-webhook` module supports webhook URL and HTTP method.
For advanced webhook configuration (custom headers, query parameters, or basic
auth), use the API directly.
### Searches
| Module | Description | Endpoint |
| ---------------------- | ------------------------------ | ------------------------------ |
| `search-job-id` | Check job processing status | `/catchAll/status/{job_id}` |
| `pull-data` | Retrieve completed job results | `/catchAll/pull/{job_id}` |
| `get-monitor-schedule` | List monitor execution history | `/catchAll/monitors/{id}/jobs` |
| `pull-monitor-results` | Get aggregated monitor records | `/catchAll/monitors/pull/{id}` |
## Jobs workflow
Build a scenario that submits a CatchAll job, waits for completion, and sends
results via email.
 Want to skip manual setup? Import the [Jobs demo scenario](https://us2.make.com/public/shared-scenario/tK4D5Fdo6Bi/demo-jobs) directly into your Make.com account.
### Add modules
Add **NewsCatcher CatchAll > query-builder**:
* **Connection**: Select your CatchAll connection
* **Query**: Enter a natural language question
* **Context** (optional): Add focus instructions
Returns suggested validators, enrichments, and a date range. For each
corresponding field in `submit-query`, you can map the `query-builder` output
using the **Map** toggle, enter your own values, or leave the field empty to
regenerate validators and enrichments from scratch when the job runs.
Add **NewsCatcher CatchAll > submit-query**:
* **Connection**: Select your CatchAll connection
* **Query**: Enter a natural language question
* **Context** (optional): Add focus instructions
* **Limit** (optional): Maximum number of records to process
* **Validators** (optional): Add validation rules to filter results
* **Enrichments** (optional): Add fields to extract from each record
* **Start Date** (optional): Set the start of the date range
* **End Date** (optional): Set the end of the date range
Add **Flow Control > Repeater**:
* **Initial value**: `1`
* **Repeats**: `10`
The Repeater creates a loop that checks job status up to 10 times (10 minutes
maximum with 60-second intervals).
Add **Tools > Sleep**:
* **Delay**: `60`
Wait 60 seconds between status checks.
Add **NewsCatcher CatchAll > search-job-id**:
* **Connection**: Select your CatchAll connection
* **Job ID**: Drag `job_id` from the **submit-query** module
Add **Flow Control > Iterator**:
* **Array**: Drag `steps` from the **search-job-id** module
The Iterator splits the steps array into individual step objects, making
Router conditions simpler.
Add **Flow Control > Router** to handle different job states.
**Customize timing**: The Repeater iterations and Sleep duration can be
adjusted based on your needs. Increase iterations for longer-running jobs or
decrease them to stay within scenario execution limits.
### Configure routes
The Router evaluates job status and directs execution to one of two routes.
Configure the first route:
1. Click the route path to open filter settings
2. **Label**: `Complete`
3. **Set as fallback**: `No`
4. **Condition** (Add two conditions with AND):
* First condition: Drag `status` from **Iterator** output
* **Operator**: `Text operators: Equal to`
* **Value**: `completed`
* Click **Add AND rule**
* Second condition: Drag `completed` from **Iterator** output
* **Operator**: `Boolean operators: Equal to`
* **Value**: `true`
5. Click **Save**
Configure the second route:
1. Click the route path to open filter settings
2. **Label**: `Failed`
3. **Set as fallback**: `No`
4. **Condition** (Add two conditions with AND):
* First condition: Drag `status` from **Iterator** output
* **Operator**: `Text operators: Equal to`
* **Value**: `failed`
* Click **Add AND rule**
* Second condition: Drag `completed` from **Iterator** output
* **Operator**: `Boolean operators: Equal to`
* **Value**: `true`
5. Click **Save**
If neither route condition is met, the Repeater continues to the next
iteration automatically.
### Add route actions
On the **Complete** route path:
1. Add **Tools > Increment function**:
* **Reset a value**: `After one cycle`
2. Add a **filter** to the connection line after Increment:
* Drag the increment value (labeled `i`) from **Increment function** output
* **Operator**: `Text operators: Equal to`
* **Value**: `1`
The filter ensures the email sends only once when the route first triggers.
3. Add **NewsCatcher CatchAll > pull-data**:
* **Connection**: Select your connection
* **Job ID**: Drag `job_id` from **submit-query** module
4. Add **Gmail > Send an Email** and configure it to send results to your email address
On the **Failed** route path:
1. Add **Tools > Increment function**:
* **Reset a value**: `After one cycle`
2. Add a **filter** to the connection line after Increment:
* Drag the increment value (labeled `i`) from **Increment function** output
* **Operator**: `Text operators: Equal to`
* **Value**: `1`
3. Add **Gmail > Send an Email** to notify yourself of the failure
## Test jobs workflow
Click **Run once** at the bottom of the editor.
Watch the scenario execute. The Repeater checks job status every 60 seconds
(up to 10 times, 10 minutes maximum) until the job completes or fails.
When complete, you receive an email with the job results.
If jobs consistently take longer than 10 minutes to complete, increase the
Repeater **Repeats** value to 15 or 20.
## Monitors workflow
Build a scenario that creates a monitor from a completed job, verifies creation,
and retrieves the initial results.
Want to skip manual setup? Import the [Jobs demo scenario](https://us2.make.com/public/shared-scenario/tK4D5Fdo6Bi/demo-jobs) directly into your Make.com account.
### Add modules
Add **NewsCatcher CatchAll > query-builder**:
* **Connection**: Select your CatchAll connection
* **Query**: Enter a natural language question
* **Context** (optional): Add focus instructions
Returns suggested validators, enrichments, and a date range. For each
corresponding field in `submit-query`, you can map the `query-builder` output
using the **Map** toggle, enter your own values, or leave the field empty to
regenerate validators and enrichments from scratch when the job runs.
Add **NewsCatcher CatchAll > submit-query**:
* **Connection**: Select your CatchAll connection
* **Query**: Enter a natural language question
* **Context** (optional): Add focus instructions
* **Limit** (optional): Maximum number of records to process
* **Validators** (optional): Add validation rules to filter results
* **Enrichments** (optional): Add fields to extract from each record
* **Start Date** (optional): Set the start of the date range
* **End Date** (optional): Set the end of the date range
Add **Flow Control > Repeater**:
* **Initial value**: `1`
* **Repeats**: `10`
The Repeater creates a loop that checks job status up to 10 times (10 minutes
maximum with 60-second intervals).
Add **Tools > Sleep**:
* **Delay**: `60`
Wait 60 seconds between status checks.
Add **NewsCatcher CatchAll > search-job-id**:
* **Connection**: Select your CatchAll connection
* **Job ID**: Drag `job_id` from the **submit-query** module
Add **Flow Control > Iterator**:
* **Array**: Drag `steps` from the **search-job-id** module
The Iterator splits the steps array into individual step objects, making
Router conditions simpler.
Add **Flow Control > Router** to handle different job states.
**Customize timing**: The Repeater iterations and Sleep duration can be
adjusted based on your needs. Increase iterations for longer-running jobs or
decrease them to stay within scenario execution limits.
### Configure routes
The Router evaluates job status and directs execution to one of two routes.
Configure the first route:
1. Click the route path to open filter settings
2. **Label**: `Complete`
3. **Set as fallback**: `No`
4. **Condition** (Add two conditions with AND):
* First condition: Drag `status` from **Iterator** output
* **Operator**: `Text operators: Equal to`
* **Value**: `completed`
* Click **Add AND rule**
* Second condition: Drag `completed` from **Iterator** output
* **Operator**: `Boolean operators: Equal to`
* **Value**: `true`
5. Click **Save**
Configure the second route:
1. Click the route path to open filter settings
2. **Label**: `Failed`
3. **Set as fallback**: `No`
4. **Condition** (Add two conditions with AND):
* First condition: Drag `status` from **Iterator** output
* **Operator**: `Text operators: Equal to`
* **Value**: `failed`
* Click **Add AND rule**
* Second condition: Drag `completed` from **Iterator** output
* **Operator**: `Boolean operators: Equal to`
* **Value**: `true`
5. Click **Save**
If neither route condition is met, the Repeater continues to the next
iteration automatically.
### Add route actions
On the **Complete** route path:
1. Add **Tools > Increment function**:
* **Reset a value**: `After one cycle`
2. Add a **filter** to the connection line after Increment:
* Drag the increment value (labeled `i`) from **Increment function** output
* **Operator**: `Text operators: Equal to`
* **Value**: `1`
The filter ensures the email sends only once when the route first triggers.
3. Add **NewsCatcher CatchAll > pull-data**:
* **Connection**: Select your connection
* **Job ID**: Drag `job_id` from **submit-query** module
4. Add **Gmail > Send an Email** and configure it to send results to your email address
On the **Failed** route path:
1. Add **Tools > Increment function**:
* **Reset a value**: `After one cycle`
2. Add a **filter** to the connection line after Increment:
* Drag the increment value (labeled `i`) from **Increment function** output
* **Operator**: `Text operators: Equal to`
* **Value**: `1`
3. Add **Gmail > Send an Email** to notify yourself of the failure
## Test jobs workflow
Click **Run once** at the bottom of the editor.
Watch the scenario execute. The Repeater checks job status every 60 seconds
(up to 10 times, 10 minutes maximum) until the job completes or fails.
When complete, you receive an email with the job results.
If jobs consistently take longer than 10 minutes to complete, increase the
Repeater **Repeats** value to 15 or 20.
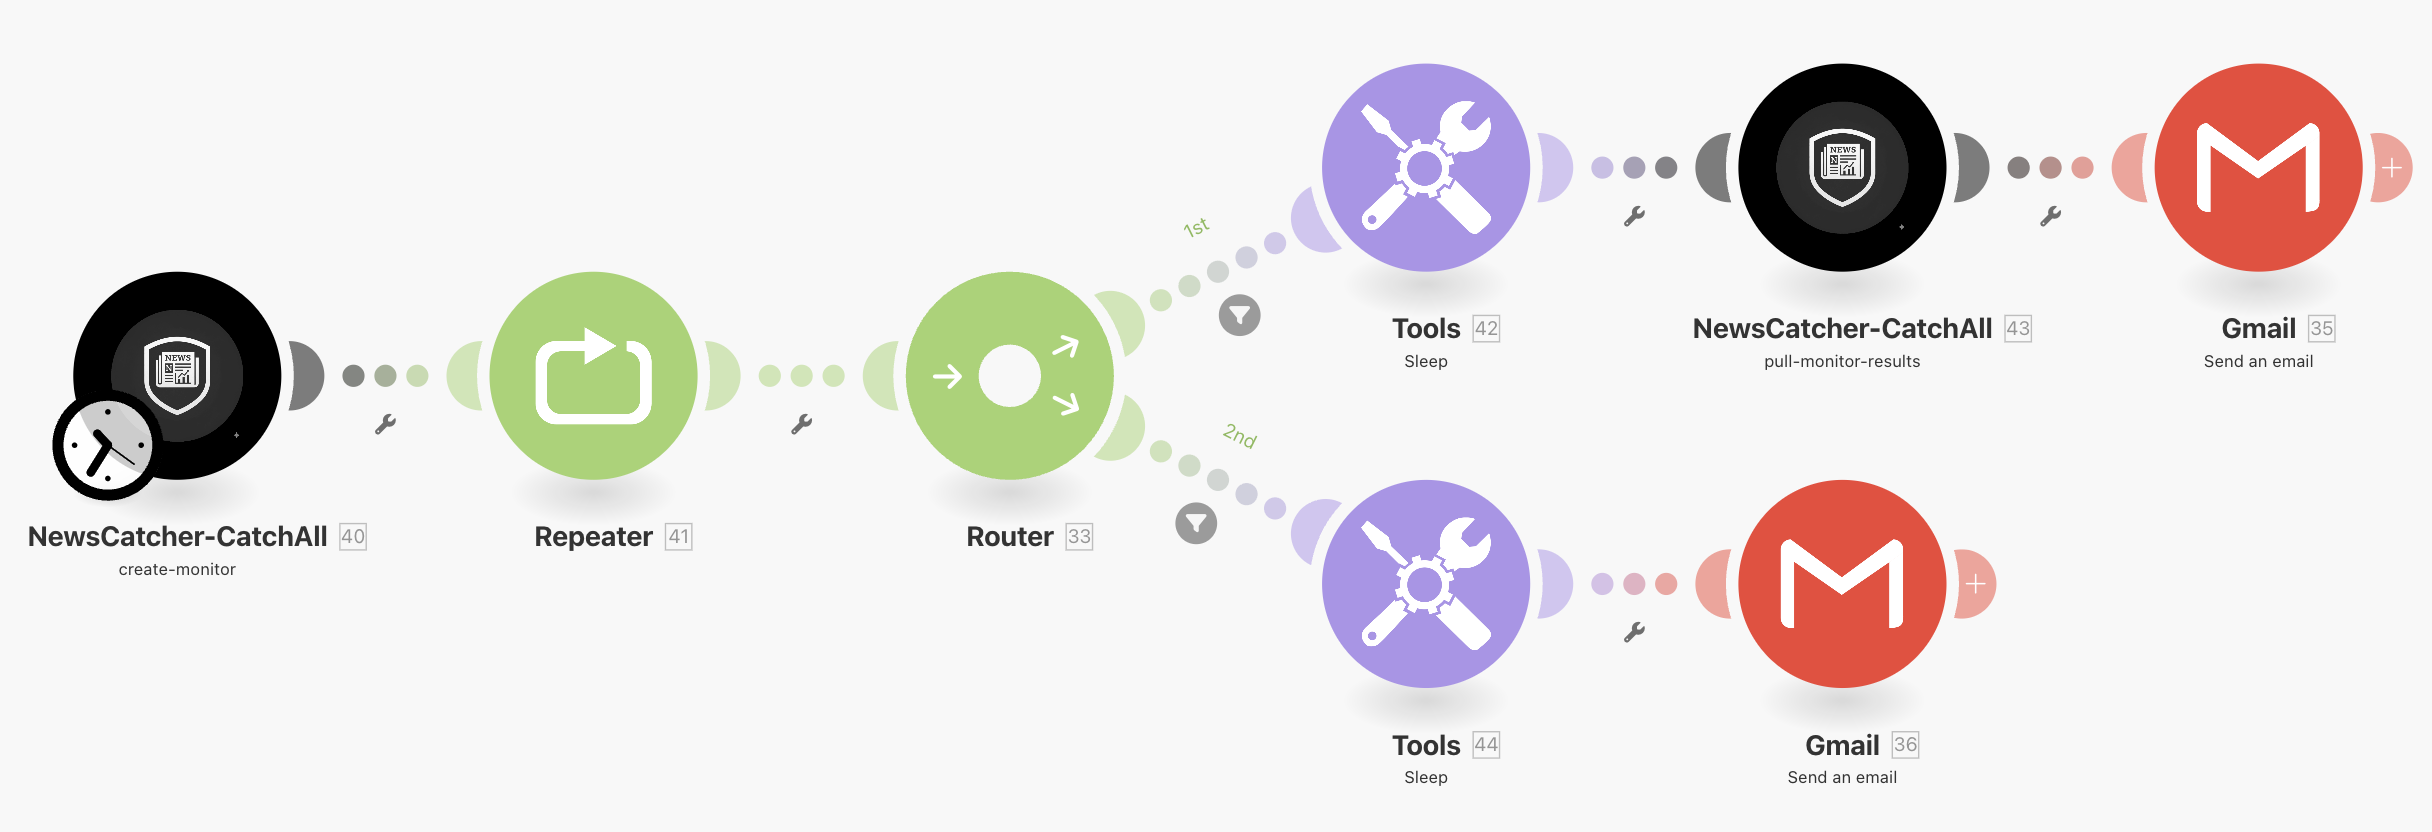
## Monitors workflow
Build a scenario that creates a monitor from a completed job, verifies creation,
and retrieves the initial results.
 Want to skip manual setup? Import the [Monitors demo scenario](https://us2.make.com/public/shared-scenario/sUKDajtqdwB/demo-monitors) directly into your Make.com account.
### Add modules
Add **NewsCatcher CatchAll > create-monitor**:
* **Connection**: Select your CatchAll connection
* **Reference Job ID**: Enter the job ID from a completed job
* **Schedule**: Enter schedule in natural language
Add **Flow Control > Repeater**:
* **Initial value**: `1`
* **Repeats**: `3`
The Repeater retries status evaluation up to 3 times if monitor creation is
delayed.
Add **Flow Control > Router** to handle creation success or failure.
### Configure routes
The Router evaluates monitor creation status and directs execution to one of two routes.
Configure the first route:
1. Click the route path to open filter settings
2. **Label**: `Success`
3. **Set as fallback**: `No`
4. **Condition**:
* Drag `status` from **create-monitor** output
* **Operator**: `Text operators: Equal to`
* **Value**: `Monitor Created Successfully`
5. Click **Save**
Configure the second route:
1. Click the route path to open filter settings
2. **Label**: `Failed`
3. **Set as fallback**: `No`
4. **Condition**:
* Drag `status` from **create-monitor** output
* **Operator**: `Text operators: Not equal to`
* **Value**: `Monitor Created Successfully`
5. Click **Save**
### Add route actions
On the **Success** route path:
1. Add **Tools > Sleep**:
* **Delay**: `1`
2. Add **NewsCatcher CatchAll > pull-monitor-results**:
* **Connection**: Select your connection
* **Monitor ID**: Drag `monitor_id` from **create-monitor** module
3. Add **Gmail > Send an Email** to send initial monitor results
On the **Failed** route path:
1. Add **Tools > Sleep**:
* **Delay**: `1`
2. Add **Gmail > Send an Email** to notify yourself of the creation failure
## Test monitors workflow
You need a completed job ID to create a monitor. If you don't have one, run a
Jobs workflow first to generate a job ID.
Click **Run once** at the bottom of the editor.
The Router evaluates the creation status immediately.
You receive an email confirming monitor creation success or failure.
After creating a monitor, it runs automatically on your schedule. Use
`pull-monitor-results` periodically to retrieve aggregated data from all
executions.
## Next steps
After verifying that your integrations work, replace the Gmail module with your
destination system:
* **Google Sheets** to save records to spreadsheet.
* **Airtable** to store structured data.
* **Webhook** to send to another service.
* **Slack/Discord** to post notifications.
## See also
* [Quickstart](/web-search-api/get-started/quickstart)
* [Monitors](/web-search-api/concepts/monitors)
* [Write effective queries](/web-search-api/how-to/write-effective-queries)
Want to skip manual setup? Import the [Monitors demo scenario](https://us2.make.com/public/shared-scenario/sUKDajtqdwB/demo-monitors) directly into your Make.com account.
### Add modules
Add **NewsCatcher CatchAll > create-monitor**:
* **Connection**: Select your CatchAll connection
* **Reference Job ID**: Enter the job ID from a completed job
* **Schedule**: Enter schedule in natural language
Add **Flow Control > Repeater**:
* **Initial value**: `1`
* **Repeats**: `3`
The Repeater retries status evaluation up to 3 times if monitor creation is
delayed.
Add **Flow Control > Router** to handle creation success or failure.
### Configure routes
The Router evaluates monitor creation status and directs execution to one of two routes.
Configure the first route:
1. Click the route path to open filter settings
2. **Label**: `Success`
3. **Set as fallback**: `No`
4. **Condition**:
* Drag `status` from **create-monitor** output
* **Operator**: `Text operators: Equal to`
* **Value**: `Monitor Created Successfully`
5. Click **Save**
Configure the second route:
1. Click the route path to open filter settings
2. **Label**: `Failed`
3. **Set as fallback**: `No`
4. **Condition**:
* Drag `status` from **create-monitor** output
* **Operator**: `Text operators: Not equal to`
* **Value**: `Monitor Created Successfully`
5. Click **Save**
### Add route actions
On the **Success** route path:
1. Add **Tools > Sleep**:
* **Delay**: `1`
2. Add **NewsCatcher CatchAll > pull-monitor-results**:
* **Connection**: Select your connection
* **Monitor ID**: Drag `monitor_id` from **create-monitor** module
3. Add **Gmail > Send an Email** to send initial monitor results
On the **Failed** route path:
1. Add **Tools > Sleep**:
* **Delay**: `1`
2. Add **Gmail > Send an Email** to notify yourself of the creation failure
## Test monitors workflow
You need a completed job ID to create a monitor. If you don't have one, run a
Jobs workflow first to generate a job ID.
Click **Run once** at the bottom of the editor.
The Router evaluates the creation status immediately.
You receive an email confirming monitor creation success or failure.
After creating a monitor, it runs automatically on your schedule. Use
`pull-monitor-results` periodically to retrieve aggregated data from all
executions.
## Next steps
After verifying that your integrations work, replace the Gmail module with your
destination system:
* **Google Sheets** to save records to spreadsheet.
* **Airtable** to store structured data.
* **Webhook** to send to another service.
* **Slack/Discord** to post notifications.
## See also
* [Quickstart](/web-search-api/get-started/quickstart)
* [Monitors](/web-search-api/concepts/monitors)
* [Write effective queries](/web-search-api/how-to/write-effective-queries)